
Extending a virtual disk is a common task. Just grow VMDK disk on VMware and then on the operating system. Usually, you don’t need a maintenance window for that. But what if you need to shrink the disk. It is not so obvious. For example, we had a virtual machine that required 1000GB disk space on the first partition, but we moved all files to the second partition, and only OS left, so we now need only 50GB. Let’s check what we can do:
- Use VMware Converter – supported by VMware when using VMware Converter converting source virtual machine as a machine source (not as virtual to virtual).
- Use Storage vMotion and change disk format to thin – I know that it is not shrinking, but we can reclaim storage space in that way.
I think that’s all if we are talking about supported ways. If you know other ways, share that in the comments. I will show you different ways that I did a lot of times, and it works. Keep in mind that VMware may not officially support this and before you start, do a backup (not snapshot)!
Requirements and limitations
- We don’t want to fight with parent and children disks, so delete all snapshots.
- Our VMDK disk has to be thick (if your disk is thin, inflate provisioned disk).
- Schedule a maintenance window.
- The procedure is limited to MS Windows VMs. I didn’t test that for other OS.
- We need at least <target disk size> MB/GB/TB on one of our datastores.
- Check if you have a backup 🙂
Shrinking disk procedure
First, we need to shutdown VM and inflate our VMDK file.

Power on VM and log into OS (user needs sufficient privileges). We need to migrate the data from the end of the disk to ensure the data will not be lost. We can use a Windows disk defragmenter or 3rd party software (/X perform free space consolidation on the specified volumes).
TIP!: Disk defragmenter cannot move some OS files. For example, pagefile. If you have a problem with the pagefile, disable it or move temporarily to another partition. If you have problem with other OS files, use 3rd party software to move it.
C:\Users\Administrator>defrag C: /X
Microsoft Drive Optimizer
Copyright (c) Microsoft Corp.
Invoking free space consolidation on (C:)...
Pre-Optimization Report:
        Volume Information:
                Volume size                 = 49.39 GB
                Free space                  = 26.70 GB
                Total fragmented space      = 13%
                Largest free space size     = 21.73 GB
        Note: File fragments larger than 64MB are not included in the fragmentation statistics.
The operation completed successfully.
Post Defragmentation Report:
        Volume Information:
                Volume size                 = 49.39 GB
                Free space                  = 26.70 GB
                Total fragmented space      = 12%
                Largest free space size     = 21.75 GB
        Note: File fragments larger than 64MB are not included in the fragmentation statistics.
Next, shrink disk on the operating system (Note: DESIRED= Specifies the desired amount of space in megabytes (MB) to reduce the volume).
C:\Users\Administrator>DISKPART
Microsoft DiskPart version 10.0.17763.1554
Copyright (C) Microsoft Corporation.
On computer: ShrinkVM-Test

DISKPART> list volume

  Volume ###  Ltr  Label        Fs     Type        Size     Status     Info
  ----------  ---  -----------  -----  ----------  -------  ---------  --------
  Volume 0     D                       DVD-ROM         0 B  No Media
  Volume 1     C                NTFS   Partition     49 GB  Healthy    Boot
  Volume 2     Recovery         NTFS   Partition    499 MB  Healthy    Hidden
  Volume 3                      FAT32  Partition    100 MB  Healthy    System

DISKPART> select volume 1
Volume 1 is the selected volume.

DISKPART> shrink querymax
The maximum number of reclaimable bytes is:   26 GB (27300 MB)

DISKPART> shrink desired=11264
DiskPart successfully shrunk the volume by:   11 GB

Shutdown guest OS. Open an SSH session to the ESXi host where VM is placed and create new VMDK file with our target disk size (for example, 40GB).
[root@ESXi:~] cd /vmfs/volumes/TestDS/Shrink-TestVM/
[root@ESXi:/vmfs/.../Shrink-TestVM] ls -al
total 52438208
drwxr-xr-x    1 root  root      77824 Feb 15 12:24 .
drwxr-xr-t    1 root  root      77824 Feb 15 11:40 ..
-rw-------    1 root  root     270840 Feb 15 12:24  Shrink-TestVM.nvram
-rw-r--r--    1 root  root          0 Feb 15 11:41  Shrink-TestVM.vmsd
-rwxr-xr-x    1 root  root       3688 Feb 15 12:24  Shrink-TestVM.vmx
-rw-------    1 root  root         47 Feb 15 11:44  Shrink-TestVM.vmxf
-rw-------    1 root  root    3277312 Feb 15 12:24  Shrink-TestVM_3-ctk.vmdk
-rw-------    1 root  root 53687091200 Feb 15 12:24 Shrink-TestVM_3-flat.vmdk
-rw-------    1 root  root         625 Feb 15 11:57 Shrink-TestVM_3.vmdk
-rw-r--r--    1 root  root      282011 Feb 15 12:24 vmware.log

[root@ESXi:/vmfs/.../Shrink-TestVM] vmkfstools -c 40G new_temp_C_drive.vmdk
Create: 100% done.
Check details of new created VMDK file and note: extent description and ddb.geometry values.
[root@EXi:/vmfs/.../Shrink-TestVM] cat new_temp_C_drive.vmdk
# Disk DescriptorFile
version=1
encoding="UTF-8"
CID=fffffffe
parentCID=ffffffff
createType="vmfs"
# Extent description
RW 83886080 VMFS "new_temp_C_drive-flat.vmdk"
# The Disk Data Base
#DDB
ddb.adapterType = "lsilogic"
ddb.geometry.cylinders = "5221"
ddb.geometry.heads = "255"
ddb.geometry.sectors = "63"
ddb.longContentID = "3882663c4ce0514c7431d495fffffffe"
ddb.uuid = "60 00 C2 99 61 59 98 06-b7 48 e9 e3 2c 76 51 4d"
ddb.virtualHWVersion = "14"
Edit the original VMDK file and change those values to the noted.
[root@ESXi:/vmfs/.../Shrink-TestVM] vi Shrink-TestVM_3.vmdk
# Disk DescriptorFile
version=3
encoding="UTF-8"
CID=28f22be8
parentCID=ffffffff
createType="vmfs"

# Extent description
# OLD VALUES: RW 104857600 VMFS "Shrink-TestVM_3-flat.vmdk"
RW 83886080 VMFS "Shrink-TestVM_3-flat.vmdk"

# Change Tracking File
changeTrackPath="Shrink-TestVM_3-ctk.vmdk"

# The Disk Data Base
#DDB

ddb.adapterType = "lsilogic"
ddb.deletable = "true"
# OLD VALUES ddb.geometry.cylinders = "6527"
ddb.geometry.cylinders = "5221"
ddb.geometry.heads = "255"
ddb.geometry.sectors = "63"
ddb.longContentID = "c86226912bb37442395ff5fc28f22be8"
ddb.thinProvisioned = "0"
ddb.toolsInstallType = "1"
ddb.toolsVersion = "11297"
ddb.uuid = "60 00 C2 95 85 1e 89 de-55 63 e6 d8 1a b4 ea 50"
ddb.virtualHWVersion = "14"
Remove the temporary disk and clone the original disk with a new descriptor.
[root@ESXi:/vmfs/.../Shrink-TestVM] rm new_temp_C_drive*
[root@ESXi:/vmfs/.../Shrink-TestVM] vmkfstools -i Shrink-TestVM_3.vmdk Shrink-TestVM_3_new.vmdk
Destination disk format: VMFS zeroedthick
Cloning disk 'Shrink-TestVM_3.vmdk'...
Clone: 100% done.
Now we have prepared shrunk VMDK disk. Let’s remove an old disk from VM and attach the new one.

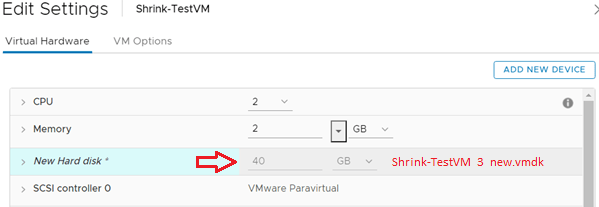
Power on VM and check disk.

Summary:
As you can see, the whole procedure is quite simple. In short words, we have to: change the descriptor, make a disk clone and attach the cloned disk. If you think that post was helpful or you have any questions, leave a comment. Stay tunned!

I carried out various tests to reduce the size of a thick VM.
This article is the best and easiest way to go. Thank you, Norbert from Bavaria
LikeLiked by 1 person